Did not manage to attend Siggraph at New Orleans this year?
Neither did I.
Fret not, Computer Graphics World put up a nifty collection of videos from the event, including presentations from ILM, Digital Domain and Autodesk, just to name a few.
Not to be missed by any CG geek!
Sep 30, 2009
CGW - Siggraph videos
Sep 28, 2009
Papercraft rapid prototyping
Ever wanted to hold your 3D creations in your hands? There is rapid prototyping aka 3D printing which has became more affordable over the years. But if you still can't muster up the cash for those services (let alone buy one of those machines which costs at least $ 30,000 USD a piece for the lower end ones), you can always turn to papercraft, which only requires a printer, mastery in 3D modeling and paper-folding.
First, make a model in your favourite 3D program. There are certain rules to follow when modeling for paper. As each polygons represent a folded surface, you want to avoid tiny polygons unless you have tiny fingers to fold them. This depends greatly on you intended size for the final product.

3D model created in Lightwave in 15 minutes.
After you are satisfied with your 3D model, load up Pepakura, a software that unfolds your 3D models and lays them out in templates for printing. If you are new to Pepakura, chances are that you will have to go back to your 3D model several times to fix stuffs that isn't working. In Pepakura, you can define the output size, how the model should be cut and the size / shape of the flaps (small surface extensions that is used to glue the separate surfaces together). Pretty straightforward, really.

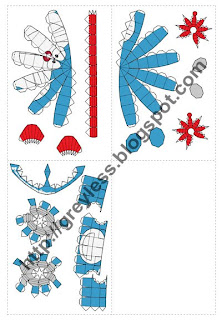
Three A4 size pages generated by Pepakura.
Once you have the template generated, all that's left to do is to print them out and cut out the shapes. The tedious part (or fun, depending on how bored you are that particular day) is folding and gluing the shapes into it's 3D parts.

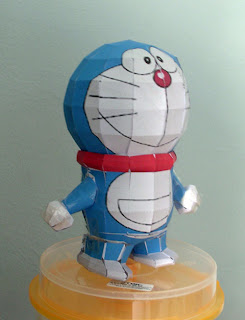
The final product is about 15 cm tall. Some parts looked "sorry" because the surfaces where tiny and difficult to fold, and we used cellophone tapes instead of glue to put it together. Notice the lack of the bell on his collar and his missing tail.
Phoebe, god bless her incredibly patient soul, took care of most of the physical work after the printing. This paper Doraemon now stands proudly on my desk.
For more impressive feats of papercraft using Pepakura, follow this link (literally).
For more impressive feats of papercraft using Pepakura, follow this link (literally).
Sep 16, 2009
Quality journalism?
Sep 15, 2009
The planet is round
Was trying out some NPR (Non-PhotoRealistic) methods to render planets. Lightwave3D ships with several cel shaders, though I usually work with Super Cel Shader and BESM (BigEyesSmallMouth). Despite their respective limitations, they produce some pretty good results with minimal tweaking.
BESM gives you more control, but doesn't play well with textures (in fact, it totally ignores it) while Super Cel Shader has less controls and does not render edges.
If you are feeling adventurous, you can even fiddle with the node system to get you own custom cel shader, though I have little success in that aspect.

Other than the big honking watermark in the middle, the map of the planet was created entirely from procedural textures. The node system is a monster to learn, but it is already established that the degree of freedom it offers is enormous compared to pre-node versions.

This is just the node view. In each of the color nodes are layer upon layers of procedural textures and mattes.
BESM gives you more control, but doesn't play well with textures (in fact, it totally ignores it) while Super Cel Shader has less controls and does not render edges.
If you are feeling adventurous, you can even fiddle with the node system to get you own custom cel shader, though I have little success in that aspect.

Other than the big honking watermark in the middle, the map of the planet was created entirely from procedural textures. The node system is a monster to learn, but it is already established that the degree of freedom it offers is enormous compared to pre-node versions.

This is just the node view. In each of the color nodes are layer upon layers of procedural textures and mattes.
Because I was aiming for a NPR result, I can settle with less amount of surface details compared to photoreal textures. Using procedurals mean I won't have to worry about texture pixelation, though I won't imagine going too near to the surface as there is not much detail to keep the close-ups interesting.
Subscribe to:
Comments (Atom)

